Tutorial
This tutorial walks you through the creation of a basic web site edition of some historical letters. It is designed to provide familiarity with how some of the pieces of Kiln work and can be used together. It is not a tutorial in the individual technologies; it does not try to teach XSLT programming, or RDF, or Solr. However, it also does not require any great knowledge of same.
Installation
Installation of Kiln itself is simple. You can download a ZIP file of all the code and unpack it, or use the Git version control system to clone the repository. Either way, the code is available at the Kiln repository, and you’ll end up with that code somewhere on your filesystem.
You’ll also need to have Java 1.7 installed. If it isn’t on your system already, you can download it from https://www.java.com/.
The development server
Let’s verify that the installation worked. From the command line, cd
into the directory where you installed Kiln. There, run the
build.sh script (if you are running GNU/Linux or Mac OS X) or the
build.bat batch file (if you are running Windows). You’ll see the
following output on the command line:
Buildfile: <path to your Kiln>/local.build.xml
Development server is running at http://127.0.0.1:9999
Quit the server with CONTROL-C.
You’ve started Jetty, a lightweight web server, that is pre-configured to run all of the various Kiln components. Note that it may take a few seconds after it prints out the above for the server to become responsive.
Now that the server is running, visit http://127.0.0.1:9999/ with your web browser. You’ll see a “Welcome to Kiln” page.
Note
Changing the port
By default, the build command starts the development server on
the internal IP at port 9999.
If you want to change the server’s port, pass it as a command-line argument. For instance, this command starts the server on port 8080:
./build.sh -Djetty.port=8080
To change the default, edit the value of jetty.port in the file
local.build.properties.
The default values of the Solr and RDF4J servers, as specified in
webapps/ROOT/sitemaps/config.xmap, use port 9999, so if
you intend to use those under the dev server, that value will need
to be changed.
Adding content
The main content of many Kiln sites is held in TEI XML files, so
let’s add some. Unzip the accompanying set of TEI files into webapps/ROOT/content/xml/tei/.
Now navigate to the text overview at http://127.0.0.1:9999/text/, available as the Texts menu option. This presents a table with various details of the texts in sortable columns. With only a homogenous collection of a few letters, this is not very useful, but it does provide links to the individual texts. Follow the link to the first letter.
Customising the TEI display
Given the enormous flexibility of the TEI to express various semantics, and the range of possible displays of a TEI document, there is no one size fits all solution to the problem of transforming a TEI document into HTML. Kiln comes with XSLT code that provides support for some types of markup, but it is expected for each project to either customise it or replace it altogether. Let’s do the former.
Kiln uses the XSLT at webapps/ROOT/stylesheets/tei/to-html.xsl to
convert TEI into HTML. Open that file in your preferred XML editor. As
you can see, it is very short! All it does is import another XSLT,
that lives at webapps/ROOT/kiln/stylesheets/tei/to-html.xsl. This
illustrates one of the ways that Kiln provides a separation between
Kiln’s defaults and project-specific material. Rather than change the
XSLT that forms part of Kiln (typically, files that live in
webapps/ROOT/kiln), you change files that themselves import those
files. This way, if you upgrade Kiln and those files have changed,
you’re not stuck trying to merge the changes you made back into the
latest file. And if you don’t want to make use of Kiln’s XSLT, just
remove the import.
Note
So how does Kiln know that we want to transform the TEI into HTML using this particular XSLT?
This is specified in a Cocoon sitemap file, which defines the URLs
in your site, and what to do, and to what, for each of them. In
this case any request for a URL starting texts/ and ending in
.html will result in the XML file with the same name being read
from the filesystem, preprocessed, and then transformed using the
to-html.xsl code.
Sitemap files are discussed later in the tutorial.
Let’s change the rendering, in an admittedly trivial way, so that the names of people and places are italicised. This involves adding a template like the following:
<xsl:template match="tei:persName | tei:placeName">
  <i>
    <xsl:apply-templates />
  </i>
</xsl:template>
Add this after the xsl:import element. Now reload the page showing
that text, and you’ll see the text rerendered with italics sprinkled
throughout.
Warning
Cocoon automatically caches the results of most requests,
and invalidates that cache when it detects changes to the files
used in creating the resource. Thus after making a change to
to-html.xsl (the one in stylesheets/tei, not the one in
kiln/stylesheets/tei/), reloading the text shows the effects of
that change. However, Cocoon does not follow xsl:import and
xsl:include references when checking for changed files. This
means that if you change such an imported/included file, the cached
version of the resource will be used.
To ensure that the cache is invalidated in such cases, update the timestamp of the including file, or the source document. This can be done by re-saving the file (add a space, remove it, and save).
Adding images
Images referenced within TEI files (using tei:figure/tei:graphic)
are converted by the kiln/stylesheets/tei/to-html.xsl XSLT into
HTML img elements. The src URL is typically to
/images/{/tei:TEI/@xml:id}/{@url} and these URLs are resolved to
look in content/images/ for the file. So if you add the following
to content/xml/tei/Had1.xml:
<figure>
  <graphic url="image-filename.jpg" />
  <figDesc>This becomes HTML alt text.</figDesc>
</figure>
and place image-filename.jpg (using whatever JPEG image file you
wish) in content/images/Had1/, the image should appear in the HTML
display.
Images that are part of the site design, rather than content, should
be put in assets/images/, and the pipelines in
kiln/sitemaps/assets.xmap used. In a template, for example:
<img src="{$kiln:assets-path}/images/logo.jpg" alt="My Favourite Sponsor" />
Kiln can support any image file type, since no processing is done to
the files. The pipelines simply transmit the files with an appropriate
MIME type. Pipelines exist for GIF, JPEG, and PNG images; others are
easily added, to sitemaps/main.xmap and/or
kiln/sitemaps/assets.xmap.
Searching and indexing
Indexing
In order to provide any useful results, the search engine must index the TEI documents. This functionality is made available in the admin section of the site. You can either index each document individually, or index them all at once.
Note
If you started Kiln with a different port from the default,
you must change the port in solr-server element in the file
webapps/ROOT/sitemaps/config.xmap to match.
There are two possible parts of customising the indexing: changing the available fields that data can be indexed into, and changing the XSLT that specifies what information gets stored in which fields.
To change the fields in the index, modify the Solr schema document at
webapps/solr/conf/schema.xml. Refer to the Solr documentation
for extensive documentation on this and all other aspects of the Solr
search platform.
It would be useful to index the recipient of each letter, so that this
may be displayed as a facet in search results. In the fields
element in schema.xml, define a recipient field:
<field indexed="true" multiValued="false" name="recipient"
       required="true" stored="true" type="string" />
After changing the schema, you will need to restart Jetty so that the new configuration is loaded. You can check the schema that Solr is using via the Solr admin interface at http://127.0.0.1:9999/solr/ (the specific URL is http://localhost:9999/solr/#/collection1/schema).
Changing the data that is indexed is done by modifying the XSLT
stylesheets/solr/tei-to-solr.xsl. Just as with the TEI to HTML
transformation, this XSLT imports a default Kiln XSLT that can be
overridden. We need to modify this file (not the default Kiln XSLT) to
add in the indexing of the recipient into the new schema. Looking at
kiln/stylesheets/solr/tei-to-solr.xsl, the default indexing XSLT
traverses through the teiHeader’s descendant elements in the mode
document-metadata. It is a simple matter to add in a template to
match on the appropriate element:
<xsl:template match="tei:profileDesc/tei:particDesc//tei:person[@role='recipient']"
              mode="document-metadata">
  <field name="recipient">
    <xsl:value-of select="normalize-space()" />
  </field>
</xsl:template>
You will also need to add a namespace declaration for the tei
prefix to the root xsl:stylesheet element:
xmlns:tei="http://www.tei-c.org/ns/1.0".
Now reindex the letters.
Warning
Omitting a namespace prefix that is used in an XPath expression in an XSLT document will cause incomprehensible and difficult to debug errors in the output, rather than a useful error message. If you get results that make no sense, check that all of the namespace prefixes that are used in the code are declared!
Facets
To customise the use of facets, modify the XML file
webapps/ROOT/assets/queries/solr/facet_query.xml. This file
defines the base query that a user’s search terms are added to, and
can also be used to customise all other parts of the query, such as
how many search results are displayed per page. The format is
straightforward; simply add elements with names matching the Solr
query parameters. You can have multiple elements with the same name,
and the query processor will construct it into the proper form for
Solr to interpret.
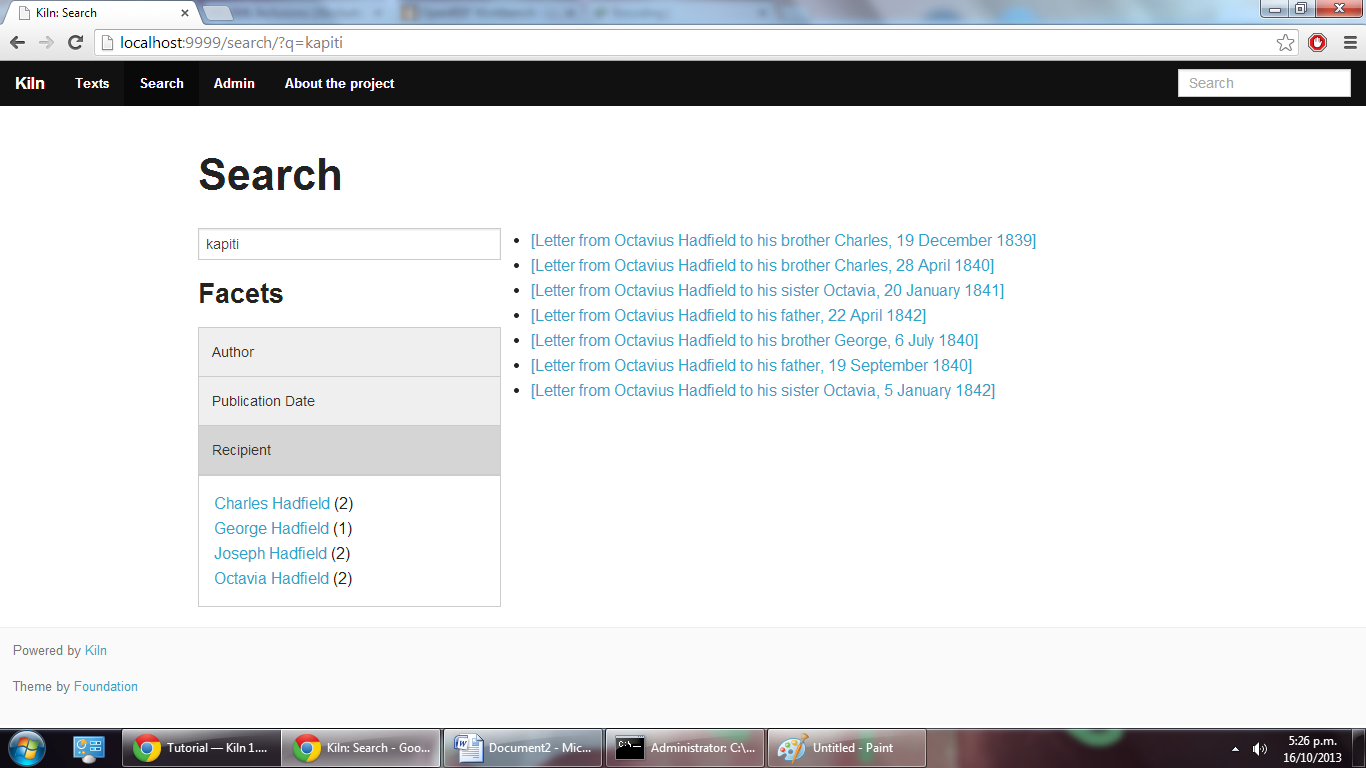
Add in a facet for the recipient field and perform a search. The new facet is automatically displayed on the search results page, and should look something like this:
Results display
The default results display is defined in
stylesheets/solr/results-to-html.xsl and gives only the title of
the matching documents. Modify that XSLT to provide whatever format of
search results best suits your needs.
Building static pages
Not all pages in a site need be generated dynamically from TEI documents. Let’s add an “About the project” page with the following steps.
Note
This section introduces a lot of concepts that may be entirely new to you. Some of this is about the Cocoon software; if you need more information, try looking at the Overview of Apache Cocoon and Cocoon Concepts documentation on the Cocoon site.
Adding a URL handler
Each URL or set of URLs available in your web application is defined
in a Cocoon sitemap that specifies the source document(s), a set of
transformations to that document, and an output format for the
result. Sitemaps are XML files, and are best edited in an XML
editor. Open the file webapps/ROOT/sitemaps/main.xmap.
The bulk of this file is the contents of the map:pipelines
element, which holds several map:pipeline elements. In turn, these
hold the URL definitions that are the map:match elements. Each
map:match has a pattern attribute that specifies the URL(s)
that it defines. This pattern can include wildcards, * and **,
that match on any sequence of characters except / and any sequence
of characters, respectively.
The order of the map:match elements is important — when a
request for a URL is handled by Kiln, it is processed using the first
map:match whose pattern matches that URL. Then the child elements
of the map:match are executed (the XML here is all interpreted as
code) in order.
Go to the part of the document that defines the handler for the
search/ URL. Below that, add in a match for the URL
about.html. Since we’ll be putting the content of the page we want
to return into the template (this is not the only way to do it!), our
source document is just the menu, and the only transformation is
applying the template. Your map:match should look something like the
following (and very similar to the one for the home page):
<map:match id="local-about" pattern="*/about.html">
  <map:aggregate element="aggregation">
    <map:part src="cocoon://_internal/menu/main.xml?url={1}/about.html" />
  </map:aggregate>
  <map:transform src="cocoon://_internal/template/about.xsl">
    <map:parameter name="language" value="{1}" />
  </map:transform>
  <map:serialize />
</map:match>
Even in such a short fragment there is a lot going
on. The pattern="about.html" attribute specifies that when a
request is made for the URL http://localhost:9999/about.html
(assuming we are running on the default Kiln development server), the
response is defined by the contents of this map:match element. As
mentioned above, each of these definitions consists of generating a
source document, transforming it in some fashion, and serialising the
result in some format (such as XML or HTML or PDF). Only one document
can be generated, and it is serialised only once, but there can be any
number of transformations that occur in between.
map:aggregate creates an XML document with a root element of
aggregation, containing in this case one part (subelement). This
part is the product of internally making a request for the URL
_internal/menu/main.xml?url=about.html, which returns the menu
structure. The use of URLs starting with cocoon:/ is common, and
allows a modular structure with lots of individual pieces that can be
put together. If you want to see the map:match that handles this
menu URL, open webapps/ROOT/kiln/sitemaps/main.xmap and look for
the kiln-menu pipeline.
Note
A pipeline (a collection of map:match elements) may be
marked as internal only (map:pipeline internal-only="true"),
meaning that it is only available to requests from within Kiln (via
a cocoon:/ or cocoon:// URL). If you request a URL that is
matched by such an internal pipeline, such as via your browser, it
will not match.
Kiln’s generic pipelines are generally marked as internal only, and
are grouped under the URL _internal (eg,
http://localhost:9999/_internal/menu/main.xml). It also uses
the convention of putting internal only pipelines that are project
specific under the URL internal (without the initial
underscore).
The templating transformation, which puts the content of the
aggregation element into a template, also internally requests a
URL. That URL returns the XML template file transformed into an XSLT
document, which is then applied to the source document!
Finally, the document is serialised; in this case no serializer is specified, meaning that the default (HTML 5) is used.
Now that the about.html URL is defined, try requesting it at
http://127.0.0.1:9999/about.html. Not surprisingly, an error occurred,
because (as the first line of the stacktrace reveals) there is no
about.xml template file. It’s time to make one.
Adding a template
Template files live in webapps/ROOT/assets/templates/. They are
XML files, and must end in .xml. In the map:match we just
created, the template was referenced at the URL
cocoon://_internal/template/about.xsl — there the xsl
extension informally specifies the format of the document returned by
a request to that URL, but it reads the source file about.xml in
the templates directory. You can see how this works in the sitemap
file webapps/ROOT/kiln/sitemaps/main.xmap in the
kiln-templating pipeline.
Create a new file, about.xml, in the template directory. We could
define everything we want output in this file, but it’s much better to
reuse the structure and style used by other pages on the site. Kiln
templates use a system of inheritance in which a parent template
defines arbitrary blocks of output that a child template can override
or append to. Open the base.xml file in the templates directory to
see the root template the default Kiln site uses. Mostly this is just
a lot of HTML, but wrapped into chunks via kiln:block
elements. Now look at the tei.xml template, which shows how a
template can inherit from another and provide content only for those
blocks that it needs to.
Go ahead and add to about.xml (using tei.xml as a guide)
whatever content you want the “About the project” page to have. This
should just be HTML markup and content, placed inside the appropriate
kiln:block elements. Since there is no source document being
transformed, there’s no need to have the xsl:import that
tei.xml has, and wherever it has xsl:value-of or
xsl:apply-templates, you should just put in whatever text and HTML
5 markup you want directly.
Harvesting RDF
In order to make use of Kiln’s RDF capabilities, some setup is required. Firstly create a repository in the RDF4J server using the “New repository” link at http://127.0.0.1:9999/rdf4j-workbench/, using the default options. The ID you provide should just contain letters.
Next set two variables in webapps/ROOT/sitemaps/config.xmap:
sesame-server-repository to the name of the repository you just
created, and rdf-base-uri to any absolute URI for your triples;
we’ll use http://www.example.org/.
With that setup done, it is time to create the XSLT that will generate
RDF XML from the TEI documents. Place the provided
harvesting XSLT at
webapps/ROOT/stylesheets/rdf/tei-to-rdf.xsl (replacing the
existing placeholder file). Now you can harvest the RDF data using the
links in the admin. You can use the workbench link given above to
examine the data in the repository.
Note
Both the ontology and the harvesting are primitive, and designed to be simple enough for the tutorial, without being entirely trivial. Harvesting the ontology from each TEI document is not good practice, nor is harvesting identifiers multiple times for the same entity.
Querying RDF
Having put RDF data into the repository, it is of course necessary to
be able to get it back out. The simplest approach is to create an XML
file in webapps/ROOT/assets/queries/sparql/ that has a root query
element containing the plain text of the SPARQL query.
For example, to retrieve just the triples giving the recipient of each
letter, save the following to
webapps/ROOT/assets/queries/sparql/recipients.xml:
<query>
PREFIX ex:<http://www.example.org/>
PREFIX rdf:<http://www.w3.org/1999/02/22-rdf-syntax-ns#>
CONSTRUCT { ?correspondence ex:has_recipient ?recipient ;
ex:has_document ?letter . }
WHERE { ?correspondence ex:has_recipient ?recipient ;
ex:has_document ?letter . }
</query>
Note
Within an XML SPARQL query document, XML rules apply, meaning that XML-significant characters (primarily <) need to be escaped (<).
To get the results from this query, use the URL
cocoon://admin/rdf/query/graph/recipients.xml in a sitemap’s
map:generate or map:part src attribute. Remember that
map:generate and map:aggregate (which contains map:part
elements) are the way that Cocoon generates a source document.
Note
While the Sesame RDF server can return results in various formats, due to Kiln working best with XML documents it is set up to make Graph Queries (using the CONSTRUCT command) with results in RDF XML.
Let’s use a similar set of query results to display a list of other letters to the same recipient on each letter’s page. As it stands the query returns the letters for all recipients in the collection, not just those that match a particular recipient. Therefore we need a way to pass in the name of the current letter’s recipient to the query and get back the filtered results. Remember that the query document is just an XML document, so we can modify it with XSLT to supply that value.
The new query should be saved at
webapps/ROOT/assets/queries/sparql/recipients.xml (you don’t need
the old version). Take a look at how it has changed, through the
addition of the recipient element placeholder and using a custom
output that better matches the information we want.
The URL mentioned above for performing a query of the RDF server calls
the URL cocoon://admin/rdf/construct/graph/{1}.xml (where “{1}” is
whatever is matched by the “**” of the first URL). This URL is handled
by a map:match in webapps/ROOT/sitemaps/rdf.xmap, by reading
the specified file. It is this map:match that needs to be modified
or added to in order to customise the query.
Since you may want to handle multiple SPARQL queries in different
ways, we’ll add another map:match, before the one with the id
“local-rdf-query-from-file”. Its pattern needs to match
/admin/rdf/construct/graph/**.xml, but be more specific to
catch only the recipient query. There also needs to be an element in
the URL that specifies the particular recipient we want to include in
the query. A pattern of
construct/graph/recipient/*.xml is suitable, where * will be
the recipient name. The path to the query file can be specified
explicitly.
Note
The “/admin/rdf” part of the URL is common to all patterns
specified in the rdf.xmap file. A sitemap file (*.xmap)
includes another sitemap by mounting it at a particular URL, and
can specify a URI prefix that is common to all URL patterns defined
therein. See the uri-prefix attributes on the map:mount
elements in main.xmap and admin.xmap.
The full map:match is as follows:
<map:match pattern="construct/graph/recipient/*.xml">
  <map:generate src="../assets/queries/sparql/recipients.xml" />
  <map:transform src="../stylesheets/rdf/add-recipient.xsl">
    <map:parameter name="recipient" value="{1}" />
  </map:transform>
  <map:serialize type="xml" />
</map:match>
Note how the name of the recipient (that will be matched by * in the pattern) is passed as a parameter to the XSLT. That XSLT, which is very simple, is as follows:
<xsl:stylesheet version="2.0"
                xmlns:xsl="http://www.w3.org/1999/XSL/Transform">

  <xsl:param name="recipient" />

  <xsl:template match="recipient">
    <xsl:value-of select="$recipient" />
  </xsl:template>

  <xsl:template match="*">
    <xsl:copy>
      <xsl:apply-templates />
    </xsl:copy>
  </xsl:template>
</xsl:stylesheet>
This should be saved to
webapps/ROOT/stylesheets/rdf/add-recipient.xsl.
Now of course we need to call the query URL, including the specific
recipient name to search on. This means the request for that URL must
come at a point in the processing that has access to the TEI document
being displayed. We’ll use an XInclude to include the query results
in our TEI document. This works by adding an XInclude element with an
href attribute specifying the URL of the resource to be included,
and then using Cocoon’s XInclude processor to perform the actual
inclusion.
To add the XInclude element, we of course use XSLT. In
webapps/ROOT/sitemaps/main.xmap, modify the map:match for TEI
display (its id is “local-tei-display-html”) to add the line:
<map:transform src="../stylesheets/tei/add-recipient-query.xsl" />
before the existing map:transform. Then place the provided
XSLT at
webapps/ROOT/stylesheets/tei/add-recipient-query.xsl. This XSLT
just copies the existing document and adds the XInclude element.
To actually process the XInclude element so that the resource at the
URL it specifies is included into the document, add the following line
to the map:match, immediately after the map:transform element
you just added:
<map:transform type="xinclude" />
Now the document that is manipulated by the template consists of a
top-level aggregation element that has three sub-elements: tei:TEI
(the TEI document), kiln:nav (the site navigation), and
rdf:RDF, the query results. It’s now possible, after all this
setup, to modify the template to transform the query results into the
list of other letters to the same recipient. Edit
webapps/ROOT/assets/templates/tei.xml and add the line:
<xsl:apply-templates mode="recipients" select="/aggregation/rdf:RDF" />
after the line that applies templates to the teiHeader element
(and before the closing div tag). You will also need to add a
namespace declaration to the kiln:root element:
xmlns:rdf="http://www.w3.org/1999/02/22-rdf-syntax-ns#"
Now edit webapps/ROOT/stylesheets/tei/to-html.xsl and add in the
following (along with, again, the RDF namespace declaration and one
binding the prefix ex to http://www.example.org/; you’ll get
some odd errors if you don’t!):
<xsl:template match="rdf:RDF" mode="recipients">
<xsl:if test="count(rdf:Description) > 1">
<div class="section-container accordion" data-section="accordion">
<section>
<h2 class="title" data-section-title="">
<small><a href="#">Other Letters to this Recipient</a></small>
</h2>
<div class="content" data-section-content="">
<ul class="no-bullet">
<xsl:apply-templates mode="recipients" />
</ul>
</div>
</section>
</div>
</xsl:if>
</xsl:template>
<xsl:template match="rdf:Description" mode="recipients">
<xsl:variable name="tei_id" select="ex:has_identifier" />
<xsl:if test="$tei_id != /aggregation/tei:TEI/@xml:id">
<li>
<a href="{$tei_id}.html">
<xsl:value-of select="ex:has_date" />
</a>
</li>
</xsl:if>
</xsl:template>
And there it is! It’s important to note that the above is not the only way to achieve this result. The XInclude step might have been incorporated into the TEI preprocessing pipeline; or the RDF query modified to use the TEI ID as the variable rather than the recipient’s name; or the letter title harvested and used as the link title rather than the date. Much depends, in crafting the components that go into generating the resource for a URL, on whether and how those components are used by other parts of the system.
Development aids
The admin section provides a few useful tools for developers in addition to the processes that can be applied to texts. The Introspection section allows you to look at some of what Kiln is doing when it runs.
Match for URL takes a URL and shows you the full Cocoon
map:match that processes that URL. It expands all references, and
links to all XSLT, so that what can be scattered across multiple
sitemap files, with many references to * and **, becomes a single
annotated piece of XML. Mousing over various parts of the output will
reveal details such as the sitemap file containing the line or the
values of wildcards.
Much the same display is available for each map:match that has an
ID, in Match by ID.
Finally, Templates by filename provides the expanded XSLT (all imported and included XSLT are recursively included) for each template, and how that template renders an empty document.
The level of detail in the error messages Kiln provides can be reduced
by setting the debug element’s value to 0 in the file
webapps/ROOT/sitemaps/config.xmap. This should be done in
production environments to avoid providing useless and/or system
information revealing information to users.